Installing Concierge

Before You Begin
You will need your Concierge licence key, which is emailed to you when your purchase is confirmed. It follows the format CNC-XXXX-XXXX-XXXX-XXXX. Keep it to hand before starting.
If you are using Option A — Direct — you will also need your Anthropic API key. This begins with sk-ant- and is available from your Anthropic account dashboard at console.anthropic.com.
If you are using Option B — Managed Proxy — your licence key is all you need. The proxy connection is configured automatically when your licence is verified.
Installing The Plugin
Log in to your WordPress admin and go to Plugins, then Add New Plugin. Click Upload Plugin at the top of the screen, choose the concierge.zip file you received, and click Install Now. Once installation is complete, click Activate Plugin.
After activation, a Concierge menu item will appear in the left-hand admin navigation. Click it to open the Settings screen.
Entering Your Licence Key
On the Settings screen, scroll to the Licence section. Paste your licence key into the Licence Key field and click Save Settings. Once saved, click the Verify Licence Now button. The plugin contacts the White Media licence server and confirms whether your key is valid.
If verification is successful, the licence status badge will change to Active, shown in green. The widget will not function until the licence is active, so always complete this step before testing.
Connecting To The API
Option A — Direct
If you are using Option A, select Option A — Direct (Bring Your Own Key) in the Connection section of the Settings screen. Enter your Anthropic API key in the Anthropic API Key field and choose your preferred AI model from the dropdown. Claude Haiku 4.5 is selected by default — it is fast and economical and suitable for most client sites. Claude Sonnet 4.6 offers a balance of capability and speed, and Claude Opus 4.6 is the most capable option for complex or demanding use cases.
Click Save Settings once your key is entered.
Option B — Managed Proxy
If you are using Option B, no further connection steps are required. When your licence is verified, Concierge automatically registers your domain with the White Media hub and configures the proxy connection. A confirmation message will appear at the top of the Settings screen once this is complete.
You do not need to enter a proxy URL or proxy secret manually. These are handled entirely by the plugin.
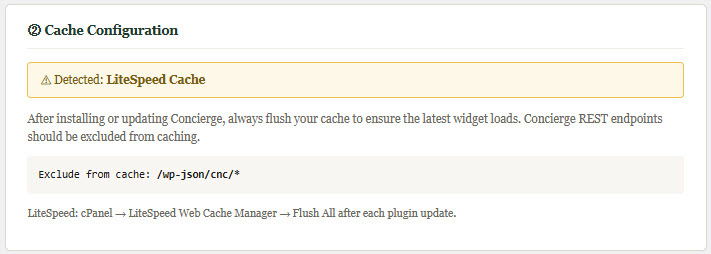
A Note On Caching
If your site uses a persistent caching plugin or is hosted on a server with Redis object caching, you may need to take one additional step after saving your settings for the first time. Flush your cache, then return to the Settings screen and click Save Settings once more. This ensures your licence status and connection credentials are read correctly rather than from a stale cache.
If you are unsure whether your site uses persistent caching, the Integration screen will display a notice if a caching plugin is detected.
Testing The Widget
Once your licence is active and your connection is configured, visit the front end of your site. A chat widget launcher button will appear in the bottom-right corner of the page. Click it to open the widget and send a test message. If the assistant responds, the installation is working correctly.
If the widget does not appear, check that the Widget enabled toggle is turned on in Settings and that your licence status shows as Active. If you are still having difficulty, see the Troubleshooting page.